a cookies 'n cream birthday cake! by Lindsey | Dolly and Oatmeal


it's birthday week over here at casa de love. me and frank's birthdays are within 3 days of each other - his before mine - and so for 3 whole days we're the same age, which for some reason is a big deal to me! we're celebrating a little bit each day. there was a rosh hashanah/bday party at my parent's house to start the week off, then a celebratory dinner at a super duper restaurant we love, we also played hooky from work and took a much needed beach day, and then there was this cake!    originally i had intended on making a larger, more monstrous cake, but then i remembered we're turning a year older and perhaps i should be more kind to our 30-something year old waists.  

aside from canned tuna fish and thai food, frank is the kind of person who is happy with whatever you feed him, so i generally (or selfishly) prepare whatever i feel like eating.  but if there's one thing he's super vocal about it's his love for anything cookies 'n cream related. back a few years ago (way before the blog) i had made him a cookies 'n cream cake using store-bought chocolate cookies, tons of heavy cream and butter, and way too much sugar.  and i'm not sure any other cake i made ever measured up to that one for him, but i wanted to change that, so i endeavored to make a gluten-free and dairy-free version of that same cake.  

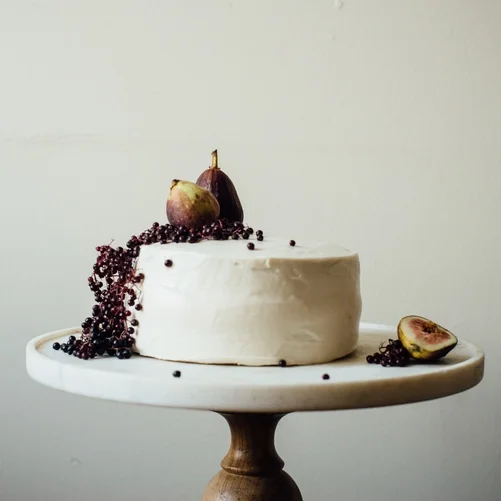
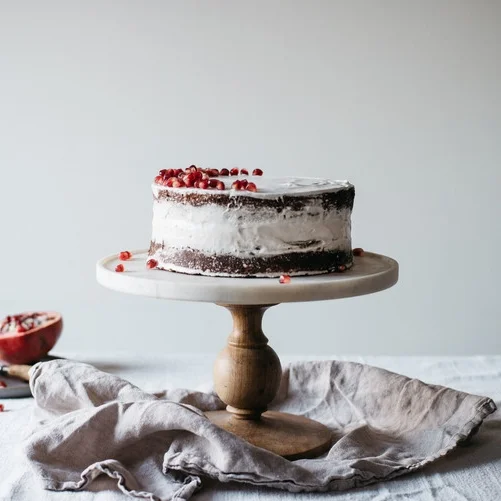
the homemade cookies here really make the difference i think; they're almost wafer-like and have subtle sweetness that don't make your teeth hurt.  the chocolate cake layers are rich and moist, somewhat brownie-like.  and then there's a super simple vanilla frosting to coat the cake, and a cookie frosting for the center, delivering that fundamental cookies 'n cream oomph!

big hugs, all! xo


cookies 'n cream cake (gf + df)

for a larger cake, this recipe can be doubled and baked in two 8-inch round cake pans, however check the cook time as larger cakes will take longer to bake - roughly 35-40 minutes.  if you're running short on time, the cookies can be store-bought, i would suggest using your go-to chocolate cookies, or there are some gluten-free and dairy-free oreos making the rounds at some grocery stores. i tried to keep the frosting as low in sugar as possible, but if you find that it's not sweet enough for your taste, feel free to add more.

| makes a double layer 6-inch cake |

cookies

  • 1 cup brown rice flour
  • 3/4 cup oat flour
  • 1/2 cup raw cacao powder
  • 3/4 cup coconut sugar
  • 1 teaspoon psyllium husk powder
  • 1/4 teaspoon baking soda
  • pinch of salt
  • 1/4 cup unrefined virgin coconut oil, melted
  • 5 tablespoons unsweetened almond milk
  • 1 teaspoon pure vanilla extract

cake

  • 1/2 cup brown rice flour
  • 1/4 cup oat flour
  • 1/4 cup almond flour
  • 3/4 cup coconut sugar
  • 1/4 cup raw cacao powder
  • 1 teaspoon psyllium husk powder
  • 1 teaspoon baking powder
  • 1/2 teaspoon baking soda
  • 1/2 teaspoon salt
  • 1/4 cup unrefined virgin coconut oil, melted
  • 1 large pasture-raised egg
  • 1 teaspoon pure vanilla extract
  • 1/2 cup full-fat coconut milk
  • 1/2 cup unsweetened almond milk

frosting

  • 2 cups non-hydrogenated palm shortening
  • 1/2 cup confectioner's sugar
  • 1 teaspoon pure vanilla extract


method

make the cookies

  • in a food processor, add the dry ingredients and pulse.  with the motor running, add the oil, 4 tablespoons milk, and vanilla, blend until dough forms a ball - if your mixture does not form a ball add the remaining tablespoons of milk.  turn dough out onto a large piece of parchment paper, about 18-inches long; with your hands, roll the dough into an even 1 1/2-inch log.  wrap with the parchment and refrigerate for at least 1 hour.
  • preheat oven to 350°F and line 2 cookie sheets with parchment paper.  with a sharp knife, slice the dough into 1/8-inch thick coins and place on cookie sheets.  bake for 10-12 minutes until firm and fragrant.  let cookies cool and place in a lidded container at room temperature until ready to use. cookies can be stored for up 4 days.    

make the cake

  • preheat oven to 350°F and oil two 6-inch round cake pans, then fit the bottoms of each pan with parchment paper; set aside.
  • in a large bowl whisk together the dry ingredients until thoroughly mixed, set aside.  in another large bowl, whisk together the oil and egg; whisk in the vanilla and milks until pale yellow.  in 2 applications, mix the dry ingredients into the wet until thoroughly combined.  divide the batter evenly into each pan and bake in the center of your oven for 30-35 minutes, or until a cake tester inserted into the center of each cake comes out clean.
  • let cakes cool on a rack until cool to the touch, then invert each layer onto a large piece of cling wrap; wrap each piece and refrigerate for at least 3 hours or overnight. 

make the frosting and assemble the cake

  • when you're ready to assemble the cake, make the vanilla frosting.  using an electric mixer, beat together the palm shortening, sugar, and vanilla on medium-high until smooth and creamy, set aside.  
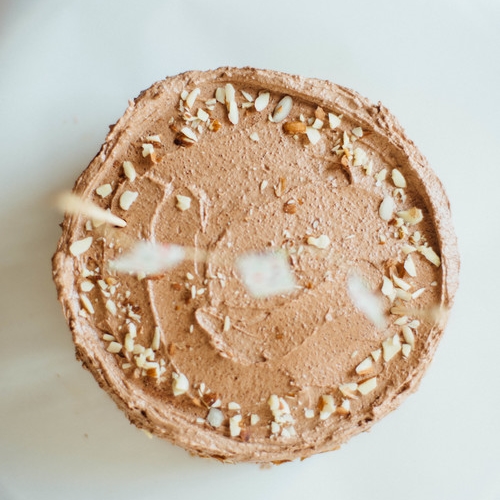
  • in a food processor, pulse about 15 cookies until finely ground. in a separate bowl, combine roughly 3/4 cup of the frosting with 4-5 tablespoons of the ground cookies.
  • remove the cake layers from the refrigerator and place one cake layer on a cake stand or serving platter.  spread the cookie-frosting evenly over the top and sprinkle the top of the frosting liberally with more ground cookies.  place the second layer on top and frost the cake with the vanilla frosting; gently press more ground cookies onto the sides of the cake, or decorate as desired.
  • serve immediately. cake can be stored in the refrigerator covered with parchment paper for up to 3-4 days.

enjoy!


more cake recipes:


chocolate layer cake w/ macadamia mouse + coconut whip

chocolate layer cake w/ macadamia mouse + coconut whip

chocolate coffee layer cake (gf + df)

chocolate coffee layer cake (gf + df)

hazelnut layer cake w/ fig compote (gf + df)

hazelnut layer cake w/ fig compote (gf + df)

grapefruit + lime-grape cooler w/ crushed mint by Lindsey | Dolly and Oatmeal


labor day weekend is generally the summer cut-off, the weekend before school starts, and before summer fridays end.  but i think a lot of us forget that the late summer season is still hanging around for nearly the entirety of september, so i'm not hanging up on summer yet - no squash, or pumpkin, or spiced baked goods just yet for me.  i'm still savoring the mounds of green goods at the market, the vast array of ripe tomatoes, and the mighty harvest of peppers and potatoes.  but by far this time of year is my absolute favorite as far as late summer fruit. the lavendar-lilac tones of figs, grapes, and plums make my eyes sore in the best way. they can be almost too sweet sometimes, but when paired with something to balance it out, be it savory, or in this case some acidity, it all makes complete sense.

with help from the lovely folks at Sanpellegrino, i made you all a beverage for your picnic, get-together, or labpr day party needs.  Sanpellegrino Sparkling Fruit Beverages offers so many lovely citrus flavors, (my favorite growing up was their aranciata [orange] flavor) including the flavor i'm highlighting here: pompelmo, or grapefruit.  it has such a wonderful zippy flavor, a perfect thirst-quencher for a these hot, late summer days!  and with all this beautiful late summer bounty, i thought i would muddle some additional flavors in there for some fun!  this is a wonderful balance of sweet grapes to tart grapefruit, and then there's a good amount of crushed mint leaves to freshen it up and give the drinks a subtle herb-y note.  i love having a non-alcoholic recipe on hand especially on long weekends when friends or family come over, i never know who's got an allergy or who is expecting a little one - but if you're into an alcoholic version i've got you covered in the notes below ;) 

happy weekend, and happy late summer! <3

*this post is sponsored by Sanpellegrino Fruit Beverages. beverages and compensation provided by Sanpellegrino.  all opinions are my own.   


grapefruit + lime-grape cooler w/ crushed mint

this drink would be perfect with a splash of vodka, a good gin (preferably not a gin that screams christmas in your mouth), or perhaps a good dry white wine. i would add just a splash to the amounts indicated below, or to taste.

| makes 8-10 servings |

lime-grape concentrate

  • 8 ounces seedless grapes (roughly 1 1/2 cups)
  • juice from 1 lime

coolers

  • 1 cup seedless grapes
  • 1 bunch mint
  • ice cubes
  • 2 cans (each 11.15 oz) Sanpellegrino pompelmo beverage 
  • 1 cup grape + lime concentrate
  • mint flowers or mint leaves, for serving
  • frozen grapes, for serving


method

for the concentrate

  • in a blender, blend together the grapes and lime juice until completely broken down, about 30 seconds.  place a fine mesh sieve (or cheesecloth) over a clean bowl; pour the juice into the sieve and use the back of a spoon to press the juice through.  pour juice into a lidded jar and refrigerate until ready to use.  juice can be stored for up to 1 week in the refrigerator.

for the coolers

  • place a few grapes and 4-5 mint leaves in a small 8 ounce glass, use a muddler or the end of a wooden spoon to crush the grapes and bruise the mint.  fill the glass halfway with ice cubes and add 2.5 ounces of Sanpellegrino pompelmo beverage (roughly 5 tablespoons), and 1.5 ounces lime-grape concentrate (roughly 2 tablespoons), give a gentle stir and top with mint flowers and frozen grapes.
  • repeat process for additional drinks.

enjoy :)


similar recipes:


hazelnut layer cake w/ fig compote

hazelnut layer cake w/ fig compote

sauteed grapes, kale, and edamame salad

sauteed grapes, kale, and edamame salad

rejuvenating citrus juice

rejuvenating citrus juice

granola ice cream w/ blackberry chia sauce by Lindsey | Dolly and Oatmeal


i often try to post a good ratio of savory dishes and sweets on the blog. so when i was going through the summer blog roll i realized that i had only posted a recipe for 1 sweet (!!!) and while it was one of my favorite recipes, it was a recipe that required you to turn your oven on : / i've been going on and on all summer about my mission to only prepare quick and simple meals, but this dessert is not one of them.  it's a 2-parter, and depending on whether you want to make your own granola (which, yes, would require you to turn on the oven) it would be a 3-parter.  but i refuse to let this summer pass before i share this recipe.

first, there's the blackberry chia sauce (based on my favorite childhood raspberry sauce) that's slightly thickened with mighty chia seeds, and lightly sweetened with maple syrup. the ice cream is a standard vegan ice cream with a coconut milk base. it's creamy and delightful, and we can all thank arrowroot powder's rich, creamy, and thickening properties for that! just before the ice cream is finished churning in goes the granola, providing the essential crunchy bits that (in my opinion) all ice creams must have.  essentially, i like to call this "breakfast meets dessert", and if you're into sweet breakfasts this isn't the worst thing you could have ;)

happy september, all! xo


granola ice cream w/ blackberry chia sauce (v + gf)

i used my nut and seed granola recipe from last year for the granola add-in, however, you can use whatever granola you have on hand, but i would stay away from any granola that's flavored or contains dried fruit. also, if you're wanting a larger yield of ice cream, this recipe can easily be doubled.

| serves 3-4 |

blackberry chia sauce

  • 1 pint blackberries
  • 2 tablespoons water
  • 1-2 tablespoons grade B maple syrup
  • 1 tablespoon chia seeds
  • 1 teaspoon pure vanilla extract

granola ice cream

  • 1 can unsweetened full-fat coconut milk (preferably with a BPA-free liner)
  • 1/4 cup grade B maple syrup
  • 1 teaspoon pure vanilla extract
  • pinch of fine sea salt
  • 1 1/2 teaspoons arrowroot powder
  • 1/4 cup granola, plus more for topping


method

blackberry sauce

  • add blackberries, water, and syrup to a small saucepan over medium heat, and stir constantly with a wooden spoon (if berries are bubbling and splattering turn heat down to medium-low). use the spoon to break berries down, and simmer the sauce until it has thickened a bit, about 10 minutes. turn heat off and stir in the chia seeds and vanilla. pour sauce into a lidded jar and let cool completely before storing in the refrigerator. chia sauce will stay good in the refrigerator for up to 2 weeks.

granola ice cream

  • prepare an ice bath and set aside.
  • place coconut milk, syrup, vanilla, and salt in a saucepan and whisk. place arrowroot powder in a small bowl, whisk in a 1/4 cup of the coconut mixture until smooth. once combined, pour back into saucepan and heat over medium. continue to whisk until mixture is steaming (if your mixture is simmering turn down to low) and thickens a bit, about 10-12 minutes.
  • remove from heat and pour into a large bowl; place the bowl in the prepared ice bath and stir ice cream mixture until cooled.  once cooled place in lidded container and store in the refrigerator until chilled all the way through, or overnight.
  • freeze mixture in your ice cream maker according to manufacturer's instructions; in the last five minutes of freezing, add the granola.
  • place ice cream into a lidded container and place in the freezer for at least 3 hours before serving. (if using a non-lidded container, press a piece of parchment paper on the surface of the ice cream and freeze.)
  • remove blackberry chia sauce from the fridge, (you can either heat it up a little bit, or serve it chilled) and serve over top of the granola ice cream. top with extra granola and serve.

enjoy!


more recipes:


superfood granola w/ almond-macadamia milk

superfood granola w/ almond-macadamia milk

coconut blu-barb ice cream (dairy-free)

coconut blu-barb ice cream (dairy-free)

granola + pear scones

granola + pear scones