celebration

MISSISSIPPI MUD PIE (GF & DF) by Lindsey | Dolly and Oatmeal


a multi-layer cake? at the end of january? because, why not!?

in all sincerity though, this month marks 8 years of this blog, dolly and oatmeal. initially, i felt kinda silly celebrating as i’ve come to it so infrequently over these past few months, and i was ready to go without acknowledging it. but if there’s one thing that means the most to me aside from my family and friends, it’s this space. a space where i’ve connected with so many of you over the years, where i’ve had the privilege of sharing recipes and stories and images, of food and meals that have made it feel like we’re all connected in some way. i only hope to continue and strengthen that connection in the coming years. and although i don’t show up here as much as i would like recently, my intention is to be back here at full capacity soon :)

now, mississippi mud pie! i’ve loved mud pie since childhood. notoriously chocolatey, and sometimes way too dense, it was always my dessert of choice as a kid. the recipe for this mud pie inspired by the ever talented samantha seneviratne and her new york times recipe for a version mississippi mud pie that called to me. her iteration is based off of matt lewis and renato poliafito’s of the bakery, baked (which was our little beloved neighborhood coffee shop when we lived in red hook). so when i came across samantha’s recipe, it felt in many ways that the stars were aligned, bringing together joyful memories of childhood and adulthood, and bringing it all to this space that also makes me so very happy. so that’s how this gluten-and-dairy-free (and grain-free) mud pie was realized.

because there are lots of layers to this pie/cake, i tried to keep it as simple as possible by not using various flours, sweeteners, etc. instead, i took care to keep the ingredient list paired down to the same ingredients - almond flour, coconut oil, cacao powder, maple syrup, coconut sugar, cashews, and eggs are our main ingredients.

we begin with a graham cracker crust, which we make from scratch (i have yet to find a store-bought variety that i like, so graham cracker crust from scratch, it is!). from there, we make a fudgy, crackly brownie layer. during its cooling period, the brownie sinks ever so gently which becomes the perfect vessel to hold our chocolate cashew custard. next, we make our vegan custard that is silky smooth, and perfectly rich - but not too rich. it’s made from soaked cashews, a good amount of melted dark chocolate, cacao powder, almond milk, and sweetened with maple syrup - *chef’s kiss*. last, is the whipped coconut cream. we whip it until a fluffy and smooth, then dollop it over the cake, and top it all with a dusting of cacao powder. it’s really the perfect mid-winter treat, or celebration cake, or pandemic-fatigue cake - just consider it your go-to, all occasion cake, really.

i hope you love this one! xo!


MISSISSIPPI MUD PIE  (GF & DF) | dolly and oatmeal

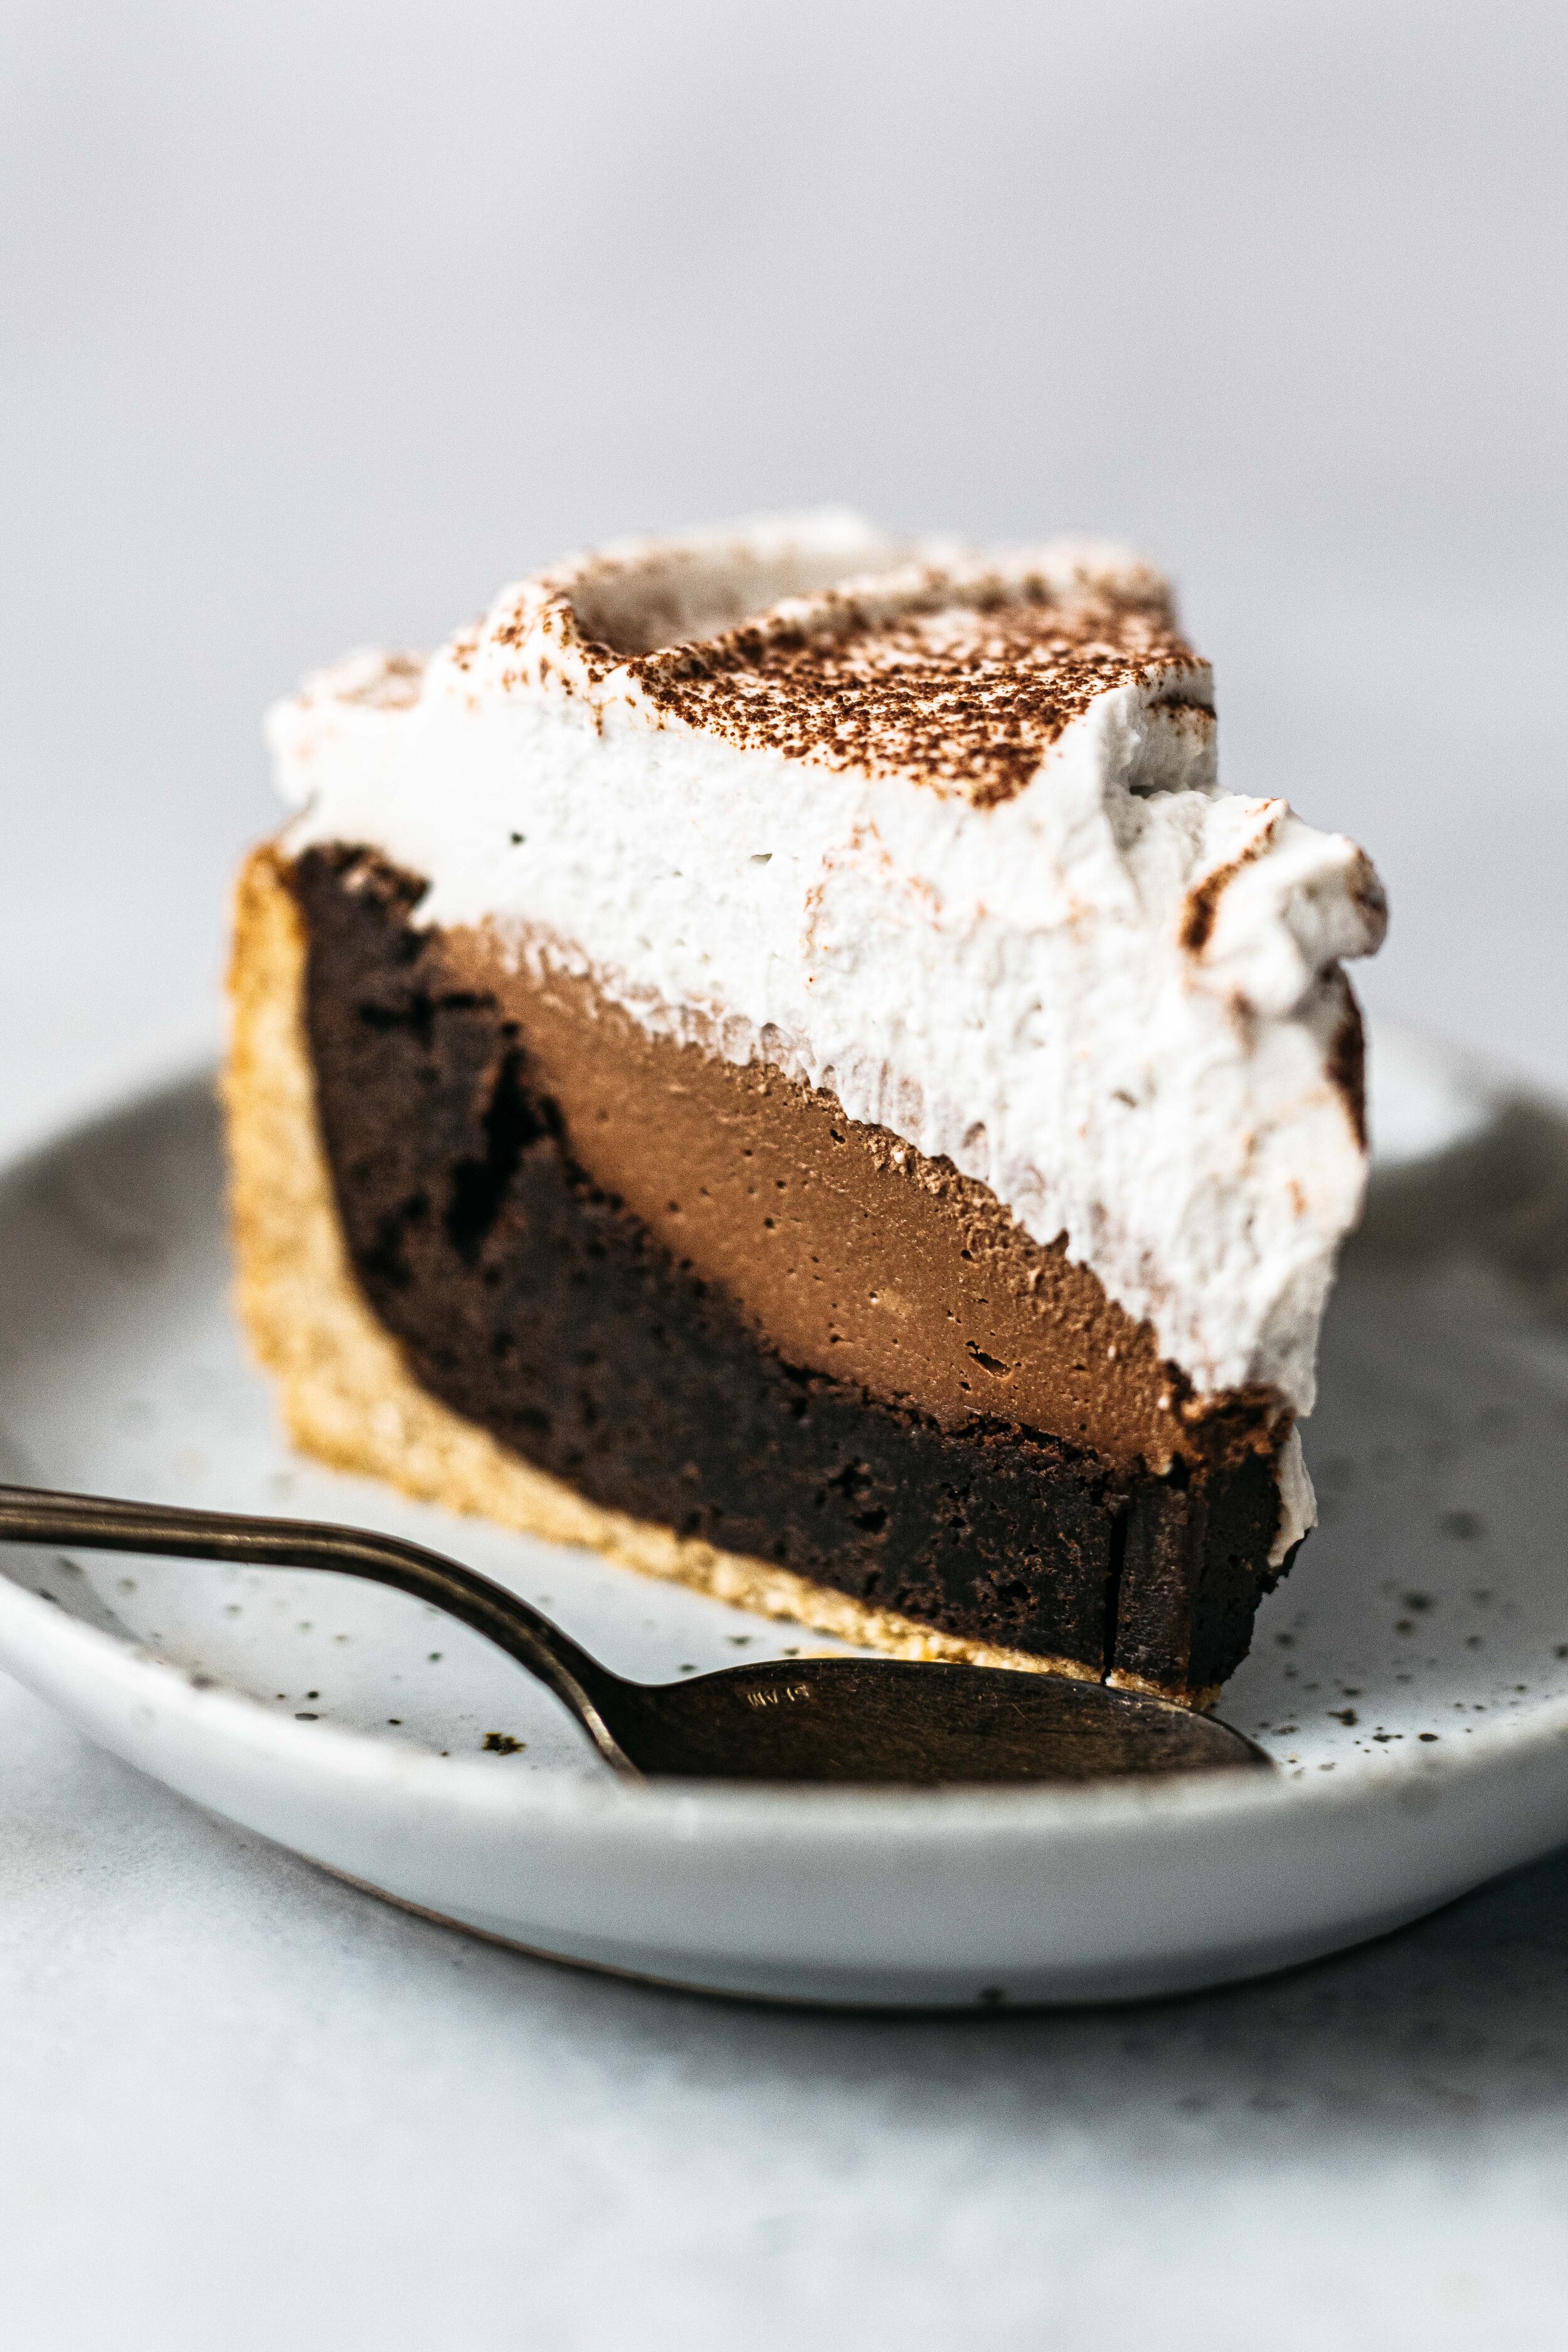
mississippi mud pie | gf & df

recipe inspired by samantha seneviratne’’s mississippi mud pie from the new york times

| makes 1 eight-inch round cake, about 16 servings |

print the recipe

ingredients:

graham cracker crust

  • 1 1/2 cups almond flour

  • 1/2 cup cassava flour

  • 1/4 cup coconut sugar

  • 1/2 teaspoon fine salt

  • 1/8 teaspoon ground cinnamon

  • 1/4 cup plus 2 tablespoons coconut oil, melted

  • 3 tablespoons water

brownie layer

  • 1 cup almond flour

  • 1/2 cup cacao powder

  • 1 teaspoon baking soda

  • 1/2 teaspoon fine salt

  • 1 cup coconut sugar

  • 2 large pasture raised eggs

  • 1/2 cup coconut oil, melted

  • 1/2 cup dark chocolate (60-70% cacao, preferably)

  • 1/2 teaspoon pure vanilla extract

chocolate cashew custard layer

  • 1/2 cup dark chocolate (60-70% cacao, preferably)

  • 1 1/2 cups raw cashews, soaked for at least 4 hours, drained and rinsed

  • 3 tablespoons cacao powder

  • 1/4 cup plus 1 tablespoon maple syrup (or honey)

  • 1/2 cup unsweetened almond milk

  • 1 teaspoon pure vanilla extract

  • pinch of salt

coconut whip

  • 2 (13.5 oz) cans coconut cream, refrigerated at least 12 hours

  • 2 tablespoons powdered sugar

  • cacao powder, for dusting (optional)


method

  1. preheat oven to 325°F. grease the bottom and sides of an 8-inch springform pan. line the bottom with parchment paper, and then grease that.

  2. make the graham cracker crust. in a large bowl, whisk together the almond flour, cassava flour, sugar, salt, and cinnamon. break up any almond flour clumps with your fingers. add the coconut oil, and water; and mix until combined and dough holds together when you squeeze it between your fingers.

  3. scatter graham cracker dough into your pan, and use your fingers to press it into an even layer, spreading it about 2 1/2 inches up the sides of the pan as well. par-bake in the oven for 10 minutes. remove, turn oven heat up to 350°F, and set the crust aside.

  4. make the brownie layer. while the graham cracker crust is baking, prepare your brownie batter. in a medium bowl, whisk together the almond flour (break up any clumps with your fingers), cacao powder, baking soda, and salt. in a large bowl, beat together the sugar and eggs with an electric mixer on high for 1-2 minutes, until the mixture becomes pale in color and has slightly thickened. in pot over low heat, melt the coconut oil and measure out 1/2 cup in a liquid measure. add the chocolate and stir to melt. once melted and cooled, mix into the egg and sugar mixture, along with the vanilla until combined.

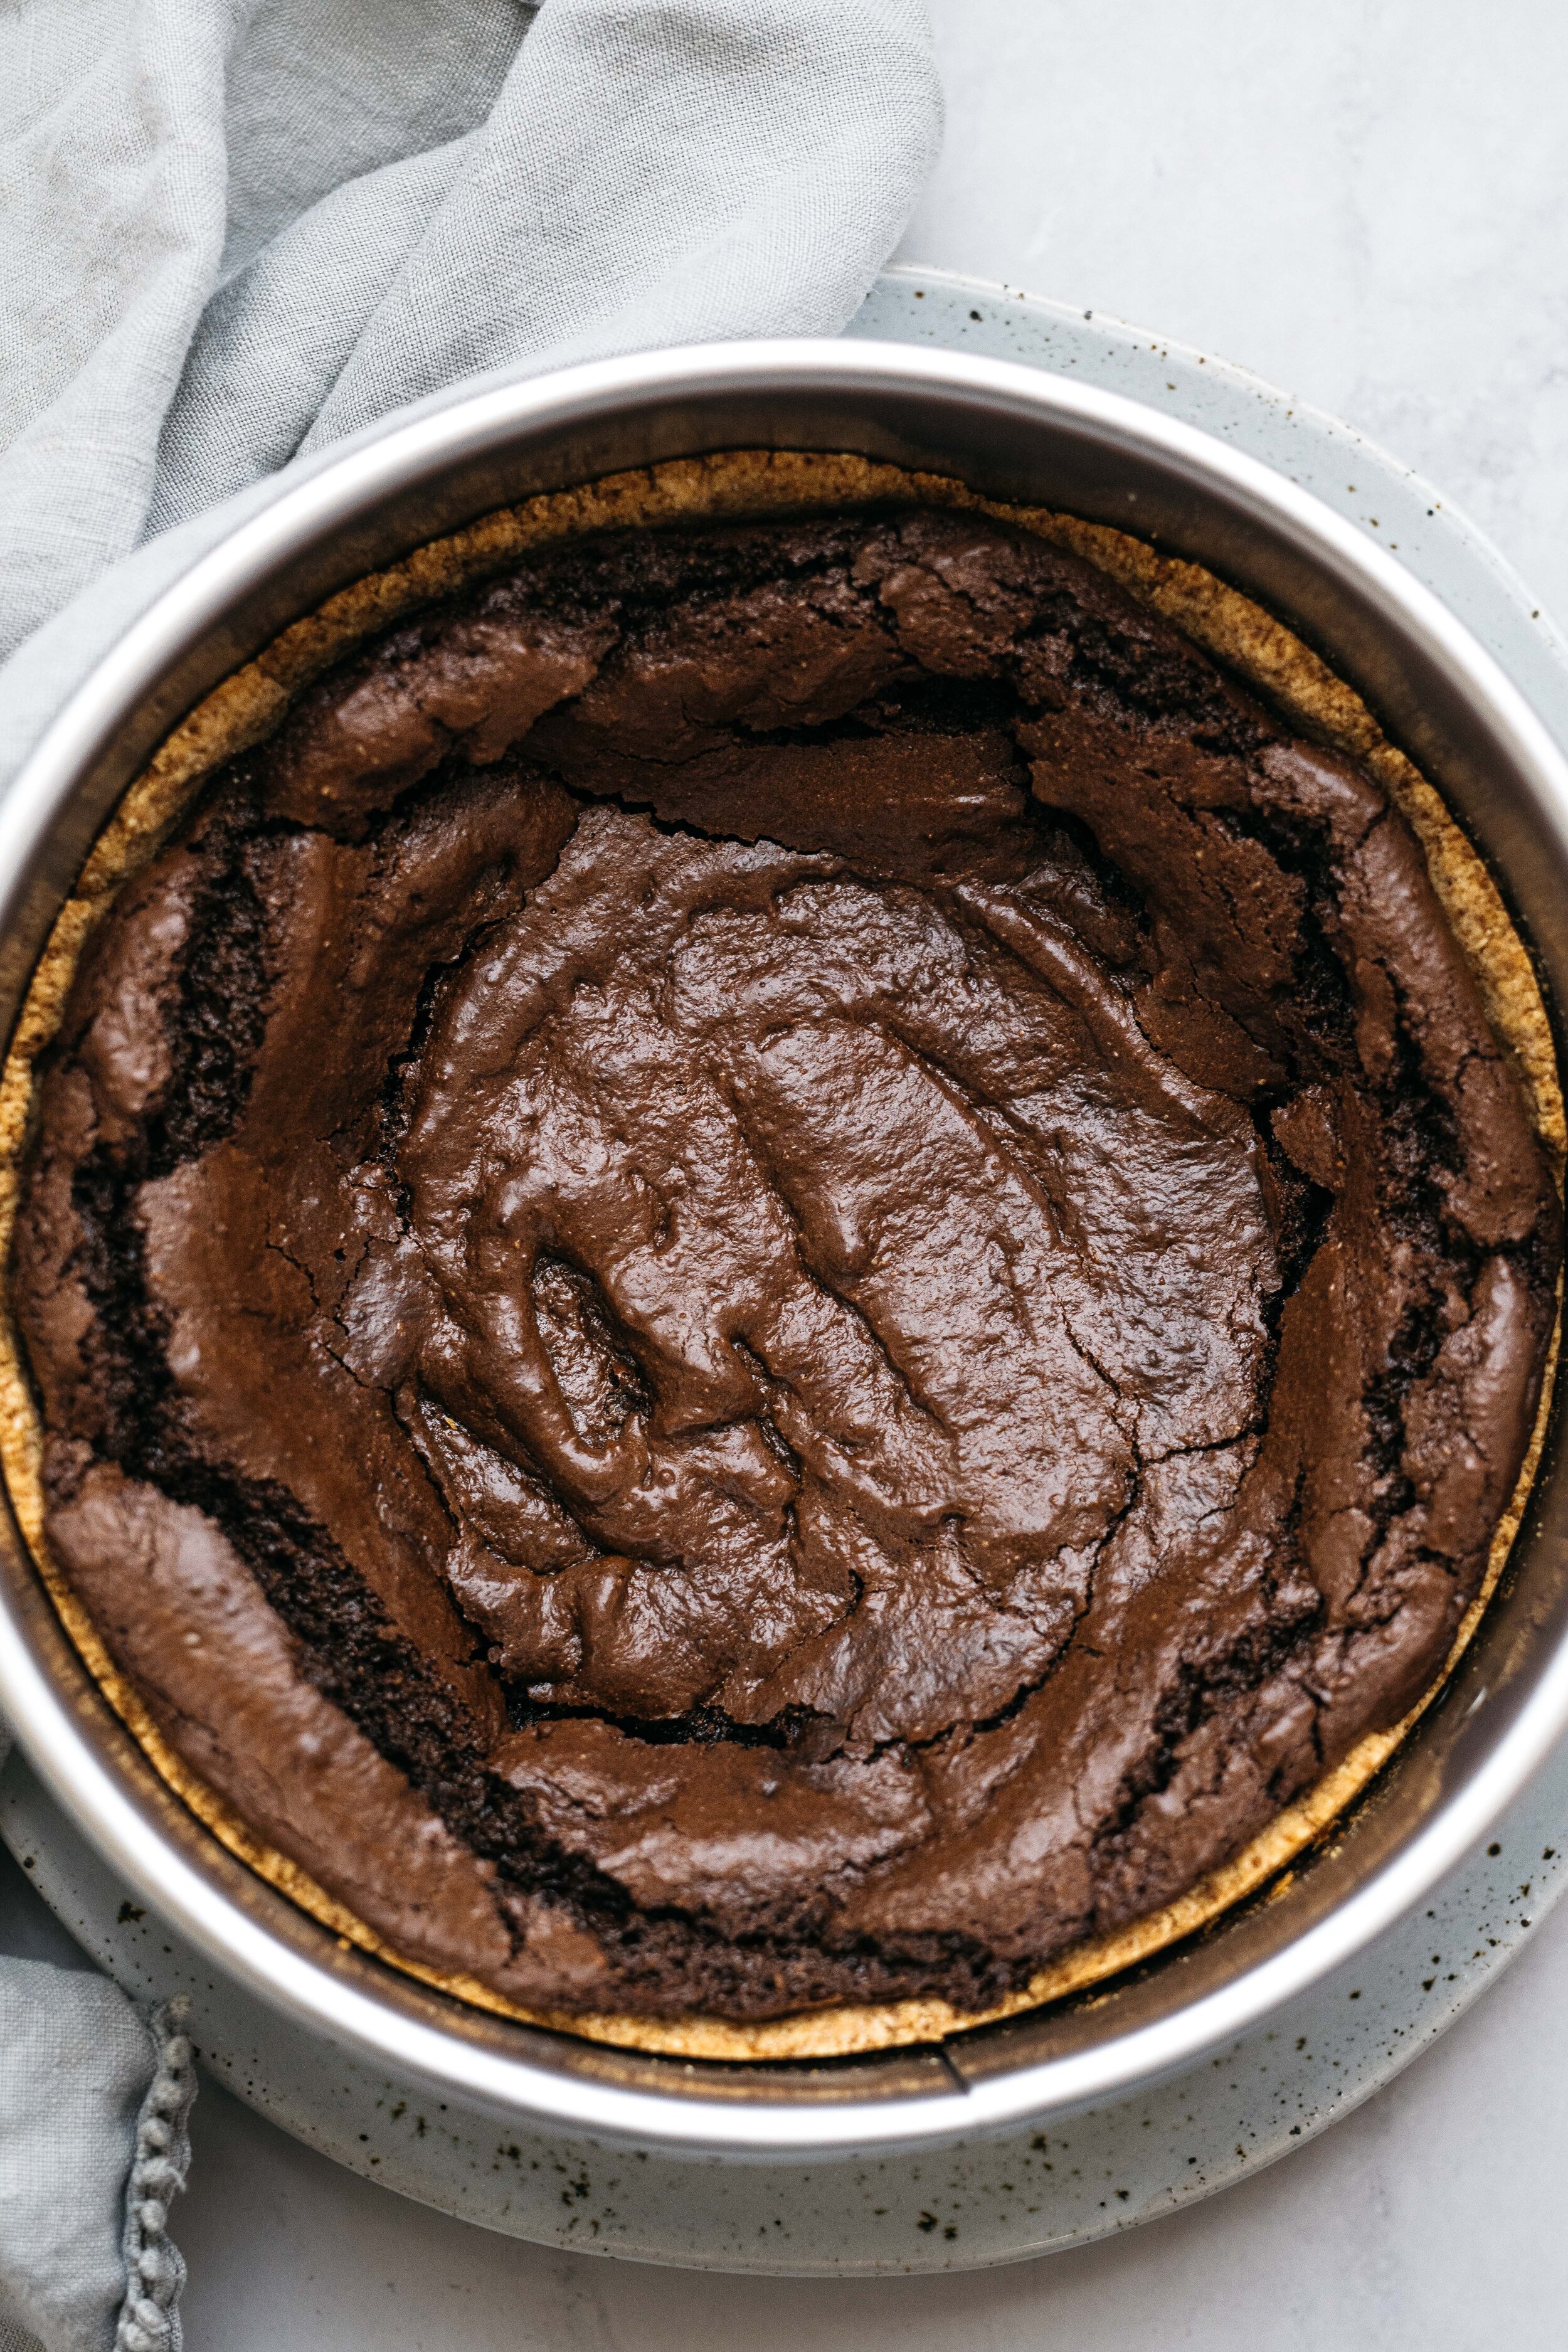
  5. a little at a time, add the dry ingredients, and mix on low until everything is combined. turn the batter out into the graham cracker crust, and use an offset spatula to smooth the top. return to the oven for 28-30 minutes, until top is set and has craggy cracks (image below for reference), and a toothpick inserted comes out with moist crumbs. place the cake on a cooling rack and let it cool completely.

  6. make the cashew custard. melt the chocolate over a double boiler, let cool. in the container of a high speed blender, combine the soaked cashews, melted chocolate, cacao powder, maple syrup, almond milk, vanilla, and salt. whiz everything together on high, stopping to scrape down the sides until everything is silky smooth. pour the custard over the cooled pie, using an offset spatula to smooth the top. tear a piece of plastic wrap, pressing it gently to cover the surface of the custard (this is to prevent a skin from forming). refrigerate at least 5 hours, or overnight.

  7. prepare the whipped coconut cream. turn the cans upside down, and open from the bottom. pour out any liquid, then scrape remaining coconut cream into a large metal bowl. beat on high until any little clumps are gone, about 1 minute. sift over powdered sugar, and beat once more until combined and coco whip is fluffy.

  8. dollop the top of the pie with the coco whip, and dust the top with cacao powder. slice, serve, and enjoy!

  9. leftover cake can be stored in the fridge for up to 4-5 days. let it sit at room temp for 1 hour before serving. store leftover pie in your fridge for up to 4 days.

recipe notes:

  • this pie can be made in increments if need be. if you want to make it ahead of time, start by making the graham cracker crust, and brownie layer. at this stage, you can cool the pie, cover it with plastic wrap and store in your fridge for up to 2-3 days. then you can go ahead and prepare the custard and whipped coconut cream as instructed.

  • the brownie layer will puff up in the oven and then deflate while it cools (this is exactly what we want), if it doesn’t deflate (as pictured below), go ahead and gently tap it on your counter a couple times to encourage it to collapse slightly.

  • the cashew custard can be made of time as well. however, i like making it the day of just because a skin can form on top. however, if you need to make it ahead, scoop it into a bowl, and press plastic wrap into its surface and store in the fridge.

  • i call for melted dark chocolate a few times in this recipe. my favorite dairy-free option is chocolove.

  • i also call for canned coconut cream - not canned coconut milk. i tried 3 different brands here, and the most successful was whole foods brand (365) coconut cream.


MISSISSIPPI MUD PIE  (GF & DF) | dolly and oatmeal
Mississippi Mud PIe 2-5.jpg

similar recipes:


chocolate chip cookie cake

chocolate chip cookie cake

double chocolate caramel cake

double chocolate caramel cake

chocolate layer cake w/ cacao macadamia mousse & coconut whip

chocolate layer cake w/ cacao macadamia mousse & coconut whip

GLUTEN-FREE CARDAMOM SUFGANIYOT (JELLY DOUGHNUTS) by Lindsey | Dolly and Oatmeal


we’re going big for hanukkah this year! i rarely fry anything, but when there’s a pandemic and all i want is for my kids to have fun memories of this time, i drag out the oil, and fry up some doughnuts! aside from the scorching hot oil part, this is a pretty fun recipe to make with kids (i don’t advise you to fry the doughnuts with your littles, and i would recommend this for ages 4 and up). it’s actually kind of easy since there are quite a few breaks to let the dough rise a couple of times, it works out pretty nicely for having time to set up for the next phase of the recipe (in case you have impatient little ones like i do 😅).

like any doughnut recipe, these require some planning ahead, and some kitchen equipment that will make everything pretty seamless. i wanted to make this recipe extra easy, so we’re using a gluten-free baking mix. the most frequent messages i get are having to do with not wanting to purchase multiple gluten-free flours for a single recipe (which i completely understand!).

like any other sufganiyot recipe, we make the dough, let it rise, punch out the doughnuts - let them rise/puff again. then we’re off to fry them, give them a sugar bath, and fill them with some jam! super easy ; ) but there is some equipment i find quite necessary that i outlined below. a digital food scale, a candy thermometer, a slotted spoon, and a pastry bag or squeeze bottle are my top picks. and of course we need some fancy serveware to make hanukkah feel extra special this year. a cake stand, dainty dessert plates (or a festive platter) all seemed pretty crucial to making this a memorable hanukkah at home. i love that everything i need to make this hanukkah special can be purchased under one roof (or website) at bed bath & beyond, it’s the perfect place to get everything you need for the holidays.

much love to you this holiday season, xo.

this post was created in partnership with bed bath & beyond. all thoughts and opinions are my own.


COOKING EQUIPMENT & SERVEWARE


cardamom sufganiyot (jelly doughnuts) | gf & df

print the recipe

| makes 18 doughnuts |

ingredients

  • 1 cup unsweetened almond milk, warmed to 105-110°F

  • 2 tablespoons honey

  • 4 teaspoons instant yeast

  • 500 grams (3 cups) bob’s red mill 1 to 1 baking flour, plus more for dusting

  • 1/3 cup cane sugar

  • 2 teaspoons cardamom

  • 1 1/2 teaspoons fine salt

  • 4 ounces (60 grams) miyoko’s plant-based butter, melted and cooled, plus more for greasing the bowl

  • 1 large egg + 1 large egg yolk, at room temperature

  • 1 teaspoon pure vanilla extract

  • sunflower oil, for frying

filling & topping

  • 1 cup cane sugar

  • 1 cup raspberry jam

method

  1. make the dough. turn your oven to its lowest temperature (preferably 170°F or lower), have it come to temp, then turn it off. (we’re going to use it let our dough proof.)

  2. whisk together the warmed milk and honey in a large bowl. sprinkle the yeast over top and allow it to rest and bloom for a few minutes.

  3. in another large bowl, whisk together the flour, sugar, cardamom, and salt.

  4. to the yeast mixture, whisk in the cooled butter, egg and egg yolk, and vanilla until combined. 1/3 at a time, add the dry ingredients to the wet, until completely combined, the dough will be slightly sticky, but workable. knead it in the bowl a couple times until it’s smooth.

  5. grease a large bowl, and scrape the dough into it. cover the bowl with a clean dishtowel (or plastic wrap), and place in your oven (at this point your oven should be slightly warm, not hot. if it’s too hot, open the door to vent it for a few minutes. we don’t want to dry out the dough). let dough rest for about 1 1/2 hours, until it’s puffed and doubled in size.

  6. prep a baking sheet with parchment, and set it aside.

  7. roll and cut the dough. dust a work surface with flour, turn dough out onto it, and dust with a bit more flour. roll dough to 1/2-inch thickness. use a 3-inch round cookie cutter and punch out as many doughnuts as you can. place them on your parchment lined baking sheet. re-roll dough and punch out doughnuts once again. scrap the remaining dough (or you could also use a 1-inch round cookie cutter to make doughnut holes with the scraps).

  8. cover the doughnuts with your dishtowel and place back in the oven. let them rise once more until puffy, about 1 hour.

  9. *prep a few things ahead of time to make your life easier: 1. line a baking sheet with paper towels and place a cooling rack inside of it. 2. place sugar in a bowl for rolling the doughnuts. fill a piping bag with your jam (i like to whisk the jam first, especially if it’s a bit firm), and attach a small tip.

  10. fry your doughnuts. when there’s about 20 minutes left in your rise time, fill a heavy bottomed pot with 3-inches of oil and attach a candy thermometer to the side. turn heat to medium-high and heat the oil until it reaches 350°F.

  11. a few at a time, drop the doughnuts gently into the oil. cook 1 minute, then flip, and cook another 1 1/2 minutes on the other side. use a slotted spoon to transfer the doughnuts to your cooling rack. repeat with remaining doughnuts (if making doughnut holes, cook for 45 seconds, then 1 minute). roll in sugar while still warm, and return to the rack.

  12. fill your doughnuts. when doughnuts are cool enough to handle pierce the side of your doughnuts (i like using a chopstick, but you could use a knife, too) and fill with about 2 teaspoons worth of jam. if you can, stack them upright so the jam fills the cavity and doesn’t pour out. serve warm. like most doughnuts, they are best served the day of, but will last for up to 2-3 days. however, they will get dry.


15 RECIPES TO COOK THIS LONG WEEKEND (GLUTEN-FREE) by Lindsey | Dolly and Oatmeal

there’s nothing more fun to me than cooking with friends and family on a long weekend. so, i’ve rounded up a combination of recipes that are perfect for easy-breezy summer weekends. one’s that are spent at the beach, in the backyard, at the park for a picnic - you name it, there’s a recipe for that! we have sides, mains, a cold slurp-able recipe, all things potatoes, summery sweets, and a mini section dedicated to grilling. so i feel like whatever you’re looking for you’ll find something here that hopefully will inspire you to make it or some version of it. wishing everyone stateside a lovely long weekend! here’s to it officially being summer! 💛


to start:

golden sunflower gazpacho - an impressive summer sipper. the great thing about gazpacho is that it’s great to make ahead of time (up to 2 days before you’re ready to serve it), and it’s cold for hot summer days! but i love this gazpacho mostly because at its base there are sunflower seeds that are blended up with the summer vegetables, making it a bit more creamy than a traditional gazpacho. plus, it’s vibrant yellow color screams summer.

bean-less sunflower seed & garlic hummus - summer isn’t summer without hummus as far as i’m concerned. neither is a long lazy weekend. this hummus is a bean-less iteration where we used soaked sunflower seeds in lieu of chickpeas. the rest of the ingredients are typical to traditional hummus: tahini, garlic, lemon juice, salt & pepper, and water. i like to jazz it up on occasion if i can using black garlic (if you have it or can find it, i highly recommend it!), or 3-4 drained shallots and 4-5 garlic drained cloves from this garlic, herb & shallot confit with some of the infused oil to top the hummus (as shown above). you really can’t go wrong with this recipe.


as a main:

niçoise sandwiches - these sandwiches are great for a day at the beach, or a picnic in the park. they pack up easy, and each component can be prepared ahead of time making assembling them on the day of that much easier. they’ve got fresh crunchy vegetables, a dreamy shallot-garlic-balsamic vinaigrette, and crunchy bread! what’s not to love?

sprouted quinoa sliders w/ garlicky cucumber slaw - these are a great alternative to your typical summer bbq meal and they’re wonderful for vegetarians or vegans. they’re made with sprouted quinoa, held together by mashed sweet potato and a bit of gluten-free breadcrumbs. the original recipe calls for ramps, but since they’re season has passed, you could easily use green onions, or leeks in their place. plus, these patties can be prepared ahead of time and then cooked the day of.

summer beet tacos w/ beet green salsa verde & spicy pickled onions - another vegetarian and vegan friendly main dish. these tacos are colorful, fun, and taste like a dream. yet another make-ahead-friendly dish, and could even be served as an appetizer on a small tortilla if you like. while beets can often fall flat because of their earthy flavor, these are jazzed up with a punchy green salsa, sharp pickled onions, creamy avocado, and good bit of lime juice.


to bake:

raspberry-currant yogurt crumble cake - to date one of my favorite ways to use summer fruit. this cake is loaded with fresh summer berries and currants. but you could easily use whatever fruit you like - be it cherries, peaches, blueberries, or some combination. it’s light and sweet, and that bit of spiced crumble topping just takes it to another delicious place.

cilantro-watermelon granita w/ mint - by far one of the easiest desserts you can make, and it’s impressive to boot! all you do is blend all the ingredients in a blender or food processor, freeze the mixture for a total of about 6 hours, and there you basically have summer in dessert form! my favorite way to serve these is in a see-through cup and, if you can find some, garnishing the tops with violet mint flowers, or even just small mint stems.

red berry blondies - for anyone who doesn’t like to make pie, but loves berries in dessert - this one’s for you! while blondies are the non-chocolate cousin to brownies, these are just as rich and dare i say a bit gooey. so be prepared for a heavier dessert with this one. the berries lighten them up a bit and definitely work to make these the ultimate summer-friendly dessert.


all things potatoes:

crunchy smashed potato salad w/ garlicky yogurt vinaigrette & pickled onions - i know i shouldn’t play favorites, but if there’s one thing you make on this list, this one’s it! it has everything you want and need in a potato salad: crunchy, salty, tender potato flecks, creamy yogurt-y dressing, and super punchy pink pickled onions! there’s nothing you or your potential guests won’t love about this potato salad!

warm fingerling potatoes w/ garlic-turmeric sauce - another potato salad mash-up with tons of flavor! the garlic-turmeric sauce is a favorite around here and is sure to add that extra something to just about anything it touches. add in some shaved red cabbage and you have yourself the perfect crunch to compliment everything else going on here.

chickpea flatbread w/ new potatoes & fresh basil - this has been one of the most popular recipes on my site for years now, and for good reason! easy homemade flatbread - check! crunchy potatoes - check! fresh summer garlic & herbs - check! there are also mushrooms for a bit of earthiness, that just adds to the flavor here. this flatbread is perfect to serve on the side to any main, or as an appetizer. either way you’re in for a treat!


to toss:

cherry panzanella - this salad is another favorite. it’s got everything you could ever want: cherries, fresh crunchy greens, heirloom tomatoes, fresh summer herbs, a punchy dressing, and crunchy bread bits! enough said! just go ahead and make it ;)

mellow melon salad - here we have a leaf-less salad composed of summer melons, julienned summer squash, grilled corn, tomatoes, and sweet shaved melon wedges. the colors in this salad scream summer, and so does its flavor - sweet and savory all at the same time!


to grill:

hickory smoked salmon skewers - these salmon skewers are one of my favorite recipes to date. the salmon is marinated in a subtle, but flavorful mustard-vinegar-based bbq sauce, then lightly grilled with hickory, giving them that bbq vibe while not completely overpowering them with smoke. minus the marinating and heating of your grill, these are a breeze to make - about 10 minutes of cooking time total! serve them over some lightly dressed greens and your meal is good to go!

grilled summer pizza w/ garden pesto & balsamic caramelized onions - if you have a bit of extra time, and want to challenge yourself beyond the limitations of your oven, then make grilled pizza! the flavor is what really takes it up a notch, especially if you use a charcoal grill. there is a learning curve here if you are using a charcoal grill, but nothing that’s too intimidating. there’s nothing better than pizza on a long weekend ;)