homemade

BAKED KABOCHA SQUASH CHIPS by Lindsey | Dolly and Oatmeal


since there’s so many thanksgiving recipes already out there, i thought i’d come in here with something festive, yet a little lighter. personally, with 2 little ones and not much time to cook, we’re planning to order our holiday sides from a local shop (frank and i are making a turkey - it’s become our yearly thing). so i thought i’d share this super easy recipe for homemade winter squash chips!

not only are they aesthetically pleasing, but they taste so good. they definitely bring me back to my Terra chip days - a bit heartier than a potato chip, and a smidge on the sweet side. because they can be a bit time consuming (and by time consuming, i mean you’re mostly just babysitting while they bake in the oven), i like to serve them with other dippers - potato chips, crackers, cut veg, etc. they bring a super festive vibe to the appetizer table, too, which i especially love this time of year :)


baked kabocha squash chips | gf & v

print the recipe!

notes:

  • if you don’t have/can’t find kabocha squash, acorn squash is a great alternative.

  • i like to serve these chips alongside other favorite dippers - potato chips, crackers, cut veg, etc.

  • go wild with seasonings. i went plain, but you could use anything here - get creative!

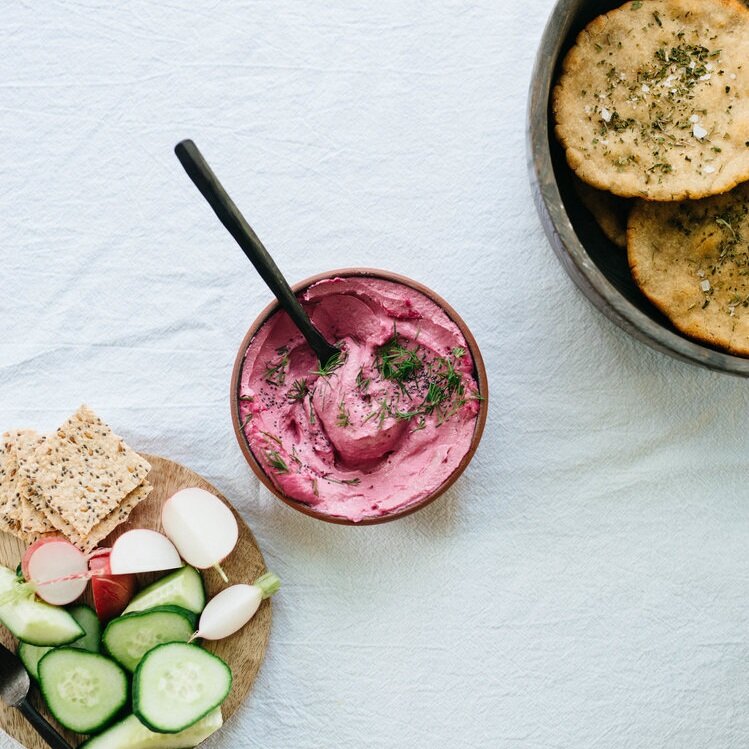
  • serve this with your favorite dip - hummus (my favorite), vegan onion dip, whipped tahini, or vegan labneh.

  • these are best eaten the day they are made, but will stay fresh in a sealed bag for up to 2 days.

ingredients

  • 1/2 kabocha squash, cut in half and seeds scooped

  • 2 tablespoons extra virgin olive oil

  • 1/2 teaspoon fine grain sea salt

  • fresh ground pepper, to taste

  • flaky salt, to finish

method

  1. preheat oven to 250°F, line 2 baking sheet with parchment or a silpat, and set aside.

  2. use a mandolin to slice the squash super thin - about 1/16-inch. with your hands, toss squash slices with the olive oil, fine salt, and pepper to taste, until all slices are nicely coated (add more oil as needed, but be careful not to add too much). arrange the squash slices in a single layer on the baking sheets.

  3. bake the squash for 1 hour, rotating the sheets top to bottom, halfway through. after 1 hour flip the chips over and continue to bake them until they’re browned and crunchy, about 30-40 minutes.

  4. remove the chips as they bake and become crispy (some chips may take longer to crisp up), transfer them to a cooling rack to cool completely.

  5. once all chips are baked and crunchy, serve with a good sprinkle of flaky salt, and a good dip (like hummus!).


similar recipes:


(bean-less) kabocha squash hummus

(bean-less) kabocha squash hummus

beet techina

beet techina

za’atar spiced chickpea crackers

za’atar spiced chickpea crackers

VANILLA PUMPKIN SEED MILK LATTE by Lindsey | Dolly and Oatmeal


happy november! what?! where did october go? anywho, let’s talk milk!

i’m not going to lie. i don’t make nut milk as often as i should. and i only say that because it’s quite possibly one of the easiest things to do, and one of the most satisfying (at least to me). i use nut milk twice a day, sometimes more. i was dismayed by the amount of plastic bottles i saw piling up every week in our recycle bin, so i got on a pretty steady homemade nut milk kick over the summer. then amesy started preschool twice a week, and as the summer ended my work schedule picked up, and everything kinda got thrown out the window.

fast forward almost 2 months later, and we’ve got a bit more of a fluid routine down. and not that i have the time (or any extra energy) every few days to make my own nut milk, but i try to add it to the (very) mild food prep i sometimes get around to on the weekend. truth be told, i think the difficulty for me lies with the soaking of the nuts. i rarely remember to. but i also feel like soaking nuts and seeds comes with its pros and cons. follow along with me on this journey:

pros:

  • soaking activates enzymes in nuts and seeds, making nutrients more readily available

  • soaking softens nuts and seeds, giving you a smoother milk (this is especially handy if you don’t have a high speed blender)

  • flavor! i personally prefer the flavor of soaked vs. non-soaked nuts and seeds, as the non-soaked have a very distinct, bitter taste to me.

cons:

  • soaked nut/seed milks have a shorter shelf life. soaked nut/seed milks last up to 2 days in the fridge. non-soaked nut-seed milks can last up to twice as long

  • REMEMBERING TO SOAK AHEAD OF TIME - i kid. kind of. but in all seriousness, soaking requires some sort of plan of action. i personally set an alert on my phone to soak before i go to bed, reminding me to do so.

shortcuts:

  • if you’re not concerned about activating enzymes, soak your nuts/seeds in boiling water for 30 minutes prior to blending. this makes them softer, giving you more milk and less pulp

  • additionally (and i only advise this for those of you who have a high speed blender like a vitamix), blend the nuts/seeds without any soaking if you’re in a pinch.

  • lastly, i always keep hemp seeds on hand for a rainy day when i look in the fridge and don’t have enough milk. they require zero soaking - ever.

a little bit about pumpkin seed milk. it’s surprisingly creamy, has a great flavor,

and has the most subtle pistachio color to it. i added vanilla bean because i love unsweetened vanilla almond milk and i honestly just wanted to try out a version at home with pumpkin seeds. you can add sweetener to your liking, but i nudge you to try it with just the vanilla bean first :) . pumpkin seed milk can really go in whatever hot beverage you prefer - coffee, matcha, rooibos, early grey, herbal coffee, etc.!

xo’s!!


vanilla pumpkin seed milk latte | v

PRINT THE RECIPE!

  • 1 cup raw pumpkin seeds, soaked for at least 3 hours or overnight

  • 3 cups filtered water

  • 1-2 vanilla beans, scraped

  • maple syrup, to taste (optional)

latte

  • 1 teaspoon ceremonial grade matcha powder

  • 1 cup boiling filtered water

  • 1/2 cup pumpkin seed milk, warmed


method

  1. rinse and drain the seeds. then add them to a high speed blender with the water, and vanilla bean (add the sweetener if using). blend on high for 1 minute, until very frothy and smooth.

  2. strain the milk through a nut milk bag over a large bowl, squeeze until there is no more liquid. discard the nut pulp, or dry it out and use it as flour. pour the milk into lidded milk containers or jars and refrigerate for up to 2 days.

  3. for the latte. carefully blend the matcha powder with the boiling water for 30-40 seconds, until completely combined. pour into a mug. rinse out your blender container or use a milk frother to froth the warm pumpkin seed milk. pour over top of your latte.


similar recipes:


iced matcha latter, two ways

iced matcha latter, two ways

homemade almond-macadamia milk

homemade almond-macadamia milk

golden dandelion latte

golden dandelion latte