sandwich

HOMEMADE GLUTEN-FREE PITA BREAD (VEGAN TOO!) by Lindsey | Dolly and Oatmeal


i can’t really contain my excitement, so we’re just going to jump right in to talking about this pita bread recipe!

when i was testing this recipe it was for just a basic, soft flatbread. i had tried a few different baking techniques and temperatures for the flatbread, and to my surprise one of them resulted in these beautifully puffy pitas 😍. i cut one open right away to find a steamy hollow pocket that was begging to be filled with all the things. and i could not think of a time that i was more excited.

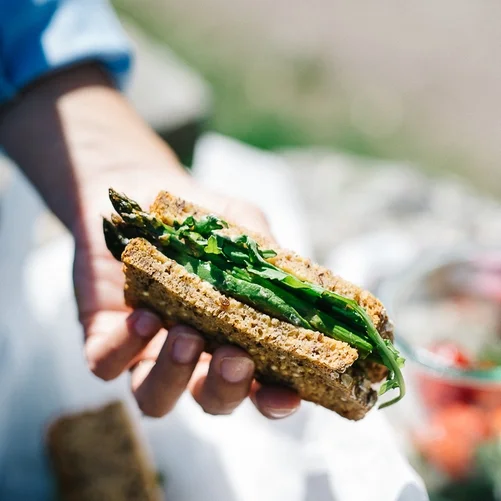
pita bread and i go way back to my childhood. my favorite was a tuna salad pita sandwich, with pita pizza coming in a close second. and on occasion, when my mom would make hummus, she would buy pita bread to serve alongside chopped veggies. when i was older i frequented an old favorite, mamoun’s. my friends and i would always go there late night and get their “classic” sandwich: pita bread stuffed with falafel, hummus, tomatoes, lettuce, onions and tahini sauce. while it was the messiest, it was also the best sandwich i ever ate. i honestly never thought i could get this close to a traditional pita bread while still being gluten-free.. until now.

with about 5 basic ingredients, this dough is super simple to put together. we start by whisking the flours and salt. from there, we bloom the yeast, and then add in the psyllium husk powder to help in binding the dough and to give it a springy texture. we let it rise, and then divide the dough. from there, we make little flat dough balls, and let them puff up a bit. we place a baking stone in the oven (or baking sheet turned upside down) and crank the heat. once the pitas are in the oven, they take about 6-8 minutes to puff up and cook through. here are a few things to keep in mind while making these:

  • rolling the pita bread out - 1/3-inch was the perfect thickness. i found that anything less than 1/3-inch resulted in pitas that didn’t puff up as well.

  • we want a hot oven! - the high heat is what makes them fluffy and puffy! so i cranked mine up as high as it would go - 550°F! if yours doesn’t go up that high, bake the bread for longer increments until it’s puffy and cooked through.

  • baking the pita bread - we don’t want to overcrowd the baking stone (or baking sheet), otherwise the pitas won’t cook evenly. i found baking them 2 at a time was best.

  • toasting the pita - i threw mine over my gas stove for a few seconds on each side just to them a wood-fired vibe, but this is completely optional.

  • reheating the pita bread - the bread is best eaten on the day it’s baked, but it can be refrigerated for up to 3-4 days and reheated in the oven (the bread does dry out a bit, so try to eat the first few days).

happy baking, friends. i hope you love this one ❤️


homemade gluten-free pita bread | v

| makes 8 pitas |

print the recipe

ingredients

  • 2 cups superfine brown rice flour, plus more for dusting (i use this one)

  • 1 cup arrowroot flour

  • 1 1/2 teaspoons salt

  • 1 2/3 cups plus 1 tablespoon filtered water, warmed to 110°-115°F

  • 1 teaspoon cane sugar

  • 1 packet instant yeast (roughly 2 1/4 teaspoons)

  • 1 tablespoon psyllium husk powder

  • extra virgin olive oil

method

  1. mix ingredients. in a large bowl, whisk together the flours and salt, set aside.

  2. in another large bowl, whisk together the warmed water and sugar. mix until sugar is dissolved. whisk in the yeast and let it sit until it has bloomed, roughly 10 minutes. whisk in the psyllium husk powder. let sit, whisking every so often until mixture has thickened and is a bit gel-like, about 5 minutes.

  3. make a hole in the center of the dry ingredients and add the wet mixture. use a rubber spatula to bring everything together. dough will be a bit shaggy and hard to stir, at this point set the rubber spatula aside, and use your hands to knead the dough together until you have a smooth, slightly sticky dough.

  4. let the dough rest. lightly oil another large bowl and place the dough inside. pat some oil on the top and sides of the dough. cover with a clean dish towel and place in warm spot until the dough has puffed up and nearly doubled in size, about 1 hour. (if not using on the day of making the dough, wrap the dough in cling wrap and place in the refrigerator for up to 1 week.)

  5. prepare the dough. line a cookie sheet or baking sheet with parchment, then dust it with brown rice flour. turn dough out onto it, and cut the dough in half. then cut each half into 4 equal sized pieces, giving you 8 pieces of dough. shape the dough into balls, dusting them with flour as needed. place a clean dish towel over top and let them rest for 30 minutes.

  6. preheat the oven. while dough is resting, place a baking stone in the center of your oven (alternatively, flip a sheet pan upside down for baking). preheat oven to 550°F.

  7. shape the pita. dust a rolling pin with flour and roll the dough into a circle that’s about 7-8 inches wide and about 1/3-inch thick (the dough tends to be a little sticky, therefore i prefer rolling it out on top of a large piece of parchment paper). repeat with remaining dough. *i like to roll and bake no more than 2 at a time. while the pitas are baking i am rolling out another 2.

  8. bake the pita. once the pita is rolled out, use a pizza peel dusted with flour (or cutting or bread board) to shuffle the pita dough onto your baking stone. bake for 4-5 minutes, until puffed up. carefully, use tongs to gently flip the pita over, cook for an additional 2-3 minutes. remove from oven and place on a cooling rack. repeat with remaining dough.

  9. eat as is, or toast over a flame. if you have a gas range, quickly toast the pita by quickly turning it over an open flame, until the edges and tops are slightly charred (this is totally optional, but it gives the pita a slightly more wood-fired, smoky flavor).

  10. store the pita. pita is best eaten the day of, but you can store it in the fridge for up to 3-4 days, or in the freezer for up to 2 months if need be.


similar recipes:


tomato toast w/ macadamia ricotta & shiso

tomato toast w/ macadamia ricotta & shiso

cilantro-hemp salad on tahini yogurt toast

cilantro-hemp salad on tahini yogurt toast

nicoise sandwiches

nicoise sandwiches

BEACH-READY NIÇOISE SANDWICH (AKA PAN BAGNAT) by Lindsey | Dolly and Oatmeal


i’m just going to get right into this sandwich. it’s not a novel sandwich to the internet, and recipe makers i’m sure. but i know my way around a tuna salad, and had never had/made one like this. it all started out a few weekends ago with an episode of the barefoot contessa where she was making a mozzarella pan bagnat (she essentially swapped out the tuna for fresh mozzarella and basil) while amesy napped. frank came home and i was literally salivating as i was telling him about this sandwich. but mostly, i was excited at the prospect of the vinaigrette she made. not only was it wonderful with a mozzarella iteration, but i kept thinking how delicious it would be in so many applications - especially in a beach-y/picnic-y sandwich situation. so, in a nutshell, that’s where this sandwich began.

this tuna salad is mashup of all the great ones i’ve had over the years. in new york, the most prevalent tuna salad you can get is a basic deli version with a ton of mayo. but here in los angeles, i’ve found tuna salad to incorporate all kinds of ingredients, and take on various flavor profiles aside from the gloppy one i had grown up with. there have been ones made with balsamic vinegar, sliced grapes, herbs, and toasted almonds. or another with sliced apples and kalamata olives. this recipe here is mashup of all the tuna salads i’ve come to know and love, all in one serving. so, if you’re a tuna fan i think you’ll love this recipe as much as i do. and if you’re not a tuna lover (like frank), stay for the vinaigrette, and do yourself a favor by making it, and pouring it over all the things!

there are a bunch of components here, but a lot of them can be prepared ahead of time. the sliced veg can be cut a day or 2 ahead of time and stored in the fridge. same goes for the vinaigrette, which can stay in fridge for up to 2 weeks. and the tuna salad is actually more flavorful if you make it the day before. and since the weather is officially warm and even hot in some places, i thought this would be the perfect sammie for a beach day, or an afternoon at the park. i just wrapped them with a bit of parchment, stuffed them in a lidded container, and was ready to go. nothing better than a breezy sandwich for the beginnings of the summer season ✌🏼

hope you enjoy the recipes, even if you’re just making the vinaigrette! xo


NIÇOISE SANDWICH (AKA PAN BAGNAT) | GF

  • if you’re vegan, i could see this vinaigrette going wonderfully into a chopped/smashed chickpea mix, or perhaps another white bean of choice.

  • a gluten free boule or baguette would ideal here. there is quite a bit of runny bits (thanks to the vinaigrette), and a basic sandwich bread mostly likely won’t hold up.

print the recipe!

| makes 4-6 sandwiches |

vinaigrette (adapted from ina garten)

  • 3 tablespoons minced shallots (roughly 1 large shallot or 2 small)

  • 1 large garlic clove, grated over a microplane (or minced)

  • 1 1/2 tablespoons red wine vinegar

  • 1 tablespoon good balsamic vinegar

  • 2 teaspoons dijon mustard

  • 1/2 cup extra virgin olive oil

  • 1/4 cup chopped kalamata olives

  • 1 tablespoon drained capers

  • fine salt & fresh ground pepper

niçoise sandwich

  • gluten-free boule, or baguette (or bread of choice)

  • two 5-ounce cans wild-caught tuna

  • 1/4 cup toasted sliced almonds

  • 2-3 tablespoons avocado mayonaise (optional)

  • 2 sprigs thyme, leaves chopped

  • 1/4-1/3 cup vinaigrette

  • fine salt & fresh pepper

extra sandwich fixings

  • peeled cucumber slices

  • thinly sliced tomatoes

  • baby arugula

  • thinly sliced red onion


method

  1. make the vinaigrette. in medium-sized bowl, whisk together the shallots, garlic, vinegars, and dijon. drizzle in the olive oil whisking briskly until emulsified. stir in the olives and capers, and season with salt & pepper. set aside.

  2. assemble the sandwiches. in a large bowl, chop the tuna with the back of a sturdy fork. mix in the almonds, mayo (if using), and thyme. add 1/4 cup of the vinaigrette, if tuna is still looking dry, add the remaining vinaigrette. taste and season with more salt & pepper if needed.

  3. slice the bread lengthwise. scoop out the doughy parts of the bread making room for all your ingredients. top one half with arugula and a good drizzle of vinaigrette, making sure to scoop some of the solids at the bottom (olives, shallots, capers, etc.) . spoon a good portion of the tuna over top. then top with sliced tomato, red onion, and cucumber. drizzle the other half of the bread with more vinaigrette. let the sandwiches sit for 30 minutes-1 hour, letting the all the flavors to blend.

  4. serve immediately, or wrap in parchment for a picnic or beach day :) (pro-tip: serve with salty potato chips and dill pickles 👍🏼)


similar recipes:


apple-arugula grilled cheese w/ crispy red onions

apple-arugula grilled cheese w/ crispy red onions

cilantro-hemp salad on tahini yogurt toast

cilantro-hemp salad on tahini yogurt toast

spicy sweet potato sandwiches

spicy sweet potato sandwiches

Avocado Club Sandwich w/ Marinated Portobello Mushrooms by Lindsey | Dolly and Oatmeal


i sit here not really knowing what to say but bursting with thoughts and feelings about the past couple of weeks.  i don't really talk much about my political views here or over on social, but i guess if you follow me on twitter then you know where my views lay. i understand we may have a difference of opinion, we all may not agree on the issues, and that's totally cool, but i hope that we can all respect and listen to one another.  we are better than the twitter wars, than the cheap shots and those we disagree with through the screens of our devices. and we are certainly better than banning a group of people entrance into our country based on what religion they subscribe to.      

in an effort to cast these gloomy times aside for a moment i put together a little list of things that are making me happy these days.  i hope they can offer you some form of sunshine as well:

  1. a DIY face mask (from one of the best babes out there) that leaves me feeling loved and cared for
  2. pups and our little pup at daycare (he's on the left)
  3. this book, this book, this book, aaaand this one!
  4. hopefully this year will be a bit more harmonious
  5. this instagram account inspires in every way
  6. what i'm snacking on lately. so good!
  7. what i'm sipping on lately :)
  8. spotted these out in LA a few weeks ago and loving their funkiness 

and last but not least, this rainbow, multi-hued, multi-textural sandwich from mckel's inspiring and nourishing book, nutrition stripped! i've been following mckel's blog for quite a while for nutritional tips, high-vibe recipes, and general advice on well being!  her recipes are bright, uncomplicated, and loaded with information about the ingredients.  her book is just the same, but with added detail about how to stock your pantry and how to food prep for the week (something i always struggle with!).  i received this book back in september when i was super duper pregnant.  i remember sitting there meticulously dog-earring all the recipes i wanted to make. and this avo and mushroom sandwich was on top of the list.  i don't often reach for mushrooms, let alone portobello mushrooms.  but the notion of making a veg-heavy sandwich with everything happening these past few weeks was necessary - gimme those carbs!  i swapped some crunchy winter-friendly ingredients in for the summer ones, and added my favorite, favorite ingredient these days this almond milk-based cream cheese.  it's a tasty sandwich that's deliciously messy in all the ways a good sandwich is, plus the marinated portobello recipe makes extra which is great for lunch bowls throughout the week :)  also, you can follow the link here to sign up for mckel's free ebook on how to live a healthier 2017!

to nourished minds, hearts, bellies, and souls! xo


Avocado Club Sandwich w/ Marinated Portobello Mushrooms

i swapped the tomatoes for thinly sliced beets (i used a mandolin to get them super thin), and the radish for shredded carrots.  and in lieu of mustard i used kite hill almond milk cream cheese.

recipe from Nutrition Stripped by McKel Hill

| serves 2 |

  • 4 portobello mushroom caps
  • 1/4 cup balsamic vinegar
  • 2 tablespoons olive oil
  • 2 tablespoons (gluten free) tamari
  • 1 tablespoon pure maple syrup
  • 2 cloves garlic, minced
  • 1 tablespoon chopped fresh thyme
  • 1 tablespoon chopped fresh rosemary
  • sea salt
  • 1 avocado
  • 2 slices gluten free bread (or mckel's grain free gluten free bread)

garnishes

  • sliced heirloom tomato
  • sliced radishes
  • butter leaf lettuce or arugula
  • dijon mustard
  • pea shoots or sprouts
  • freshly ground black pepper


method

  1. using a mandolin or knife, thinly slice (less than 1/4-inch) the portobello mushrooms.  in a deep baking dish, combine the vinegar, oil, tamari, maple syrup, garlic, thyme, rosemary, and a pinch of salt.  whisk to combine.
  2. gently arrange the mushroom sliced flat in the baking dish to absorb the marinade.  cover and store in the fridge for 2 hours.  remove and stir, flipping the mushrooms over to ensure all the liquid is being evenly absorbed, then re-cover and refrigerate for at least 8 hours. the mushrooms may be stored in an airtight container in the refrigerator for up to 5 days.
  3. to serve, mash 1/4 to 1/2 avocado on each bread slice, add a pinch of salt, then evenly layer the marinated mushrooms. top with desired garnishes. 

similar recipes:


avocado asparagus sandwich

avocado asparagus sandwich

miso-tahini avocado toast w/ black sesame gomasio

miso-tahini avocado toast w/ black sesame gomasio

spicy sweet potato chip & avocado sammie 

spicy sweet potato chip & avocado sammie